Recently, I presented my first talk at an R Ladies meetup, in beautiful Cape Town. I was lucky enough to be invited to particpate in this with two amazing R Ladies, Maëlle Salmon and Stephanie Kovalchik. I had a great time and really enjoyed giving my very first R stats talk.
I considered not actually turning my talk into a blog post, as there are already some amazing resources out there by many people (some fantastic ones are curated by Mara Averick). However, the talk actually made me realise that writing a blog post from my presentation could work as there are people who have not had any exposure to the great Yihui Xie package blogdown. So here follows some advice and workflow for starting your very own blog (or even website) using the blogdown package!
Starting is easier than you think!

via Giphy
This will be a very basic introduction to starting a blog/website with blogdown. Essentially, this is a quick and dirty starting point that will get you going in a short amount of time, if you choose to not tweak things too much!
In case of emergency!
Follow the advice in Blogdown by Xie, Thomas, and Presmanes Hill
and the blog post Jon The Geek: Blogging in About Ten Minutes
What will you need?
In R
- Rstudio
- Working knowledge of R Markdown
- The blogdown package (available via CRAN)
Outside R
Git and Github
You will need to create a Github account- Your static site “lives” here
You will also need to install Git on your machine. After installing Git on your computer, you will need to enable this when you create a project for your blog in R Studio.
If you need help with Git and version control, please consult Jenny Bryan’s Happy Git with R.
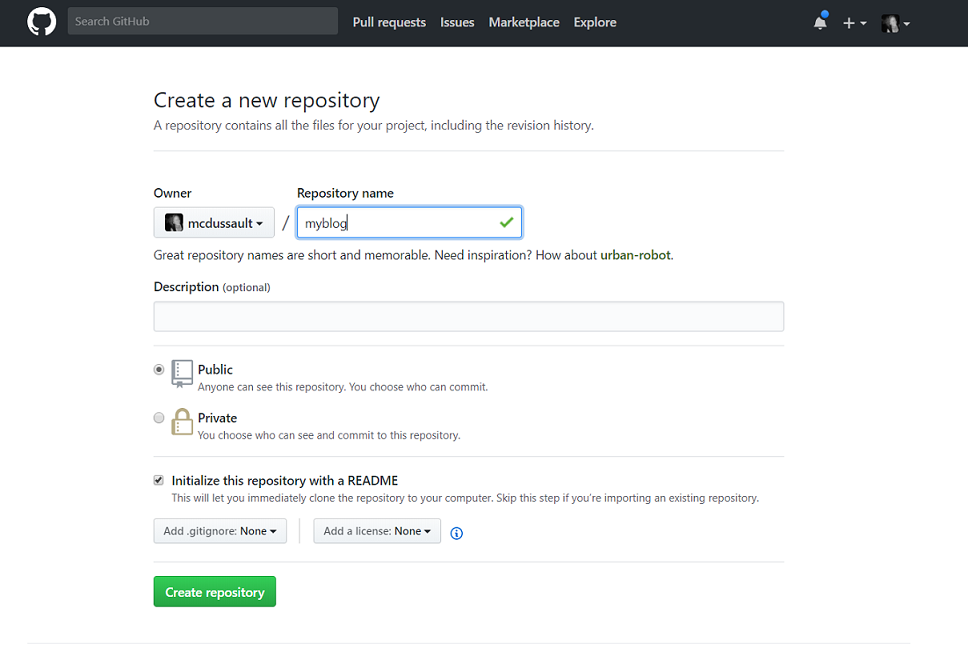
Create your new Github repo
If you have read the blodown book, this is where my process will differ slightly, but I find this workflow simplifies it even more! Visit Github New Repository or click the Plus symbol (top right) of your account landing page to create a new repository for your blog. Pick a name for the repository that will identify it as your blog.
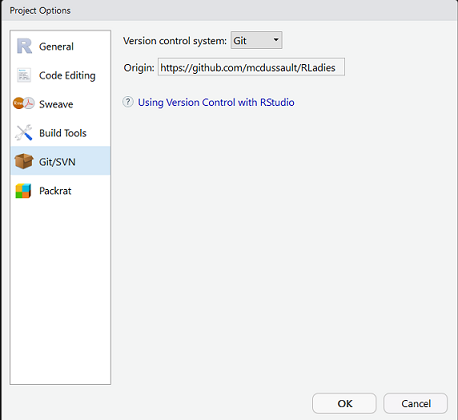
Create your RStudio project
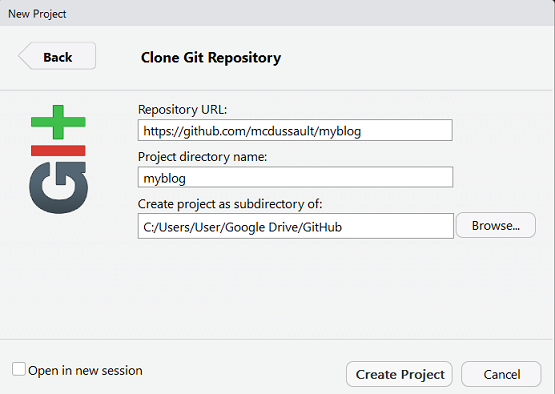
The next step is to create a new project within R Studio. When creating the new project, select Version Control > Git so that you can link this project to your Github account.
Paste the URL of your git repository and include where your github directory lives on your computer.
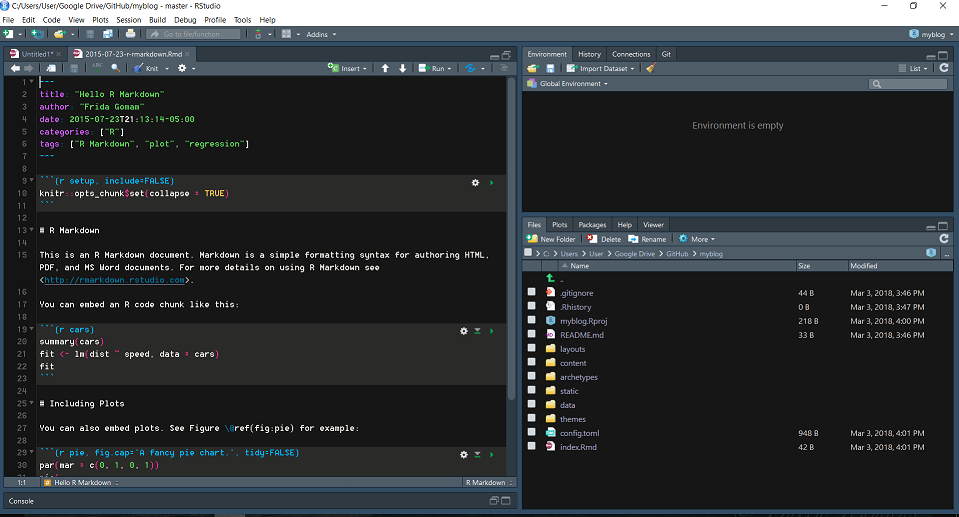
And now, Blogdown!
To generate a generic a blogdown site quickly, using the built in theme and set up, you will need to use the following code.
library(blogdown)
install_hugo()
new_site()
Blogdown will generate the necessary file structure within your directory and populate some example files as well as CSS files for the theme.
Themes
Your theme will give your blog some flavour and will help to organise it depending on your purpose. Some themes are strictly for blogging, some help you to display your past projects and can include additional pages for this purpose. Themes can be found at the Hugo website, displaying what they look like and including links to the require github repos.
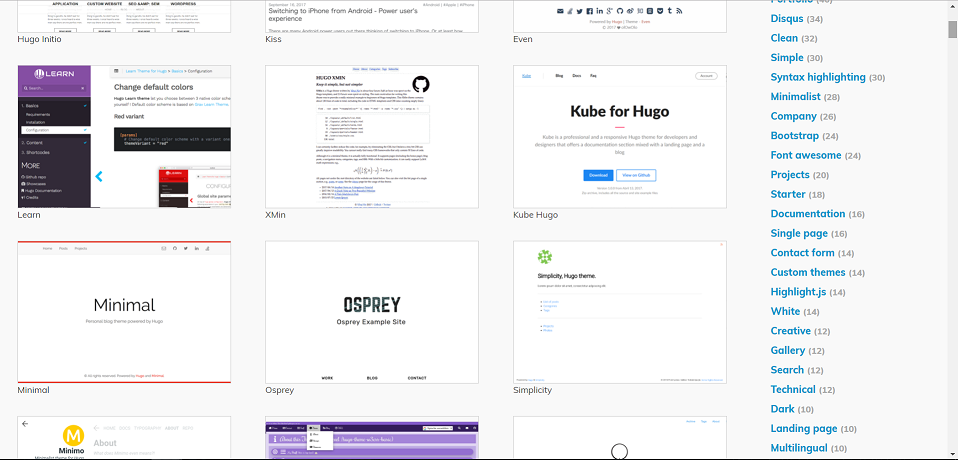
Installing a theme
I recommend picking your theme before you build your site. I made the mistake of building my site with the theme that comes with blogdown out of the box and then became very confused trying to alter it to my chosen theme! Following the blogdown book advice, it is best to pick your theme first, find the address for it’s github repo and then create your new site using the following code:
new_site(theme = "gcushen/hugo-academic")Configuration file
Once you have picked your theme and ran the code which generates your new site, you will start tweaking the website a little bit! This will customise your site with a title, relevant accounts for communication with the author and a little customising the URL format of your posts.
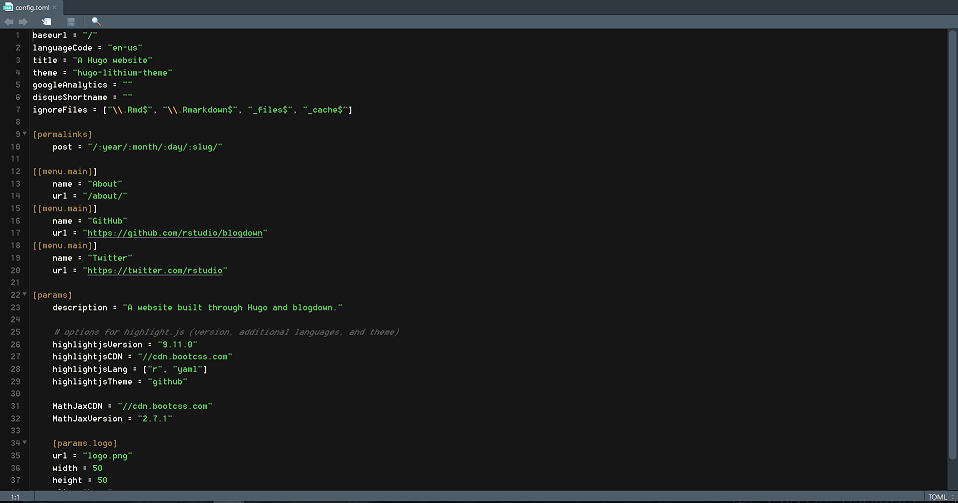 The following are the fields that you can start customising:
- Title Pick a title for your blog
- Google analytics: Account details, if you have one
- Discus: Account details, if you have one
- Post: The way the URL format of your post will be. Unless you want something specific, the default should be suitable
- Name: Whatever you’d like to be known as
- URL: URL to your about section - Can be changed later on!
- About: This is set up to direct to your “About” file
- Github/Twitter: Populate with account links
- Description: Can be updated with your own description
- Baseurl: This will be changed later on
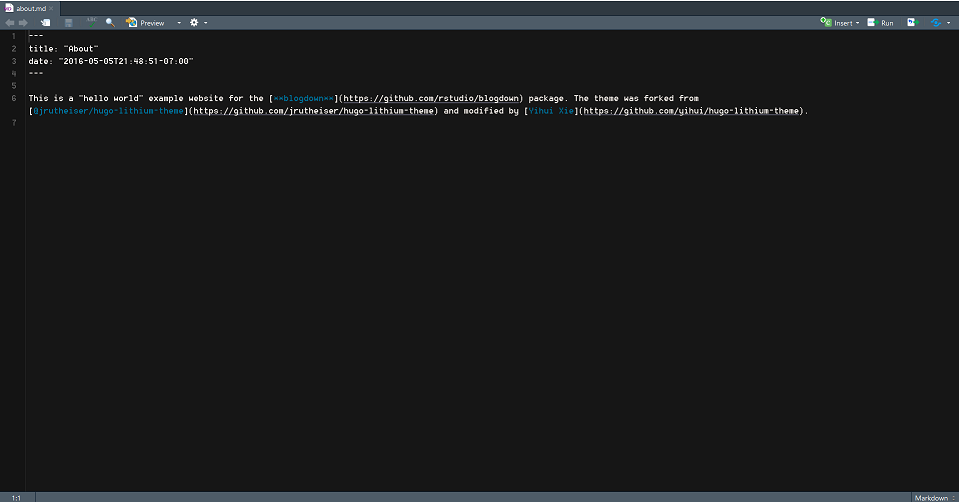
About.md
In the content folder of your blog, you will find the About.md file. This can be modified to reflect whatever you want to tell the world about yourself. An About link on your main page will redirect here.
Cleaning out unecessary files
When creating your new site, it is populated with example files in the content > post folder. It is advisable to deleted these files so they are not pushed to your site when you deploy it.

via Giphy
Serving your site
Seeing the site is the best part! Now that you have put together the bones of your site, you can serve the site so that you can see what it will look like. Navigate to your Addins dropdown menu in R Studio. Select Serve Site from the dropdown and admire the awesomeness in your Viewer window!

via Giphy
You can now go back to any of the previous steps and tweak things if you don’t like what you see!
Time to…

via Giphy
Commit to Github!
The following steps apply if you are using Git with R Studio.
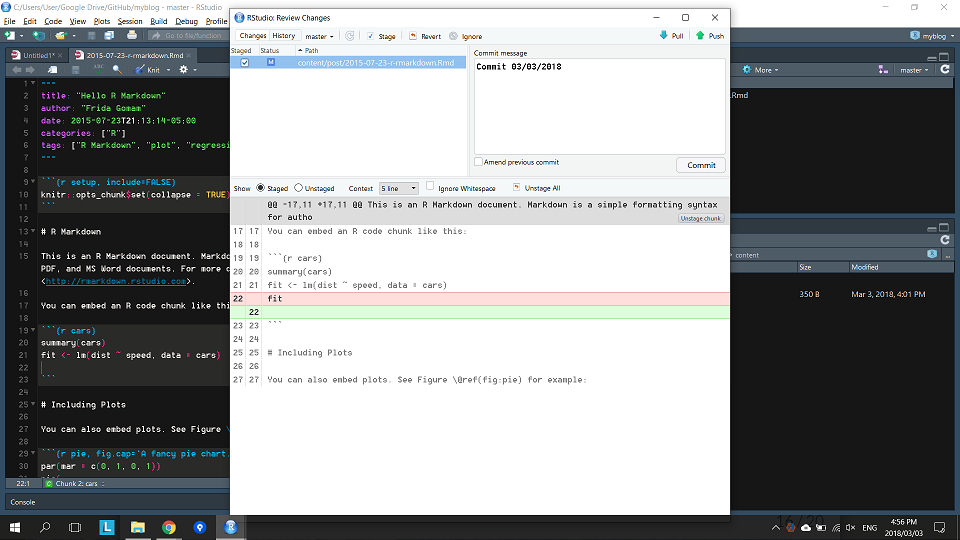
Select the Git tab in the top right corner of R Studio. Select all the files for staging by clicking in the boxes. Include a commit message of your choice, that will be descriptive enough to follow what stage of the process this commit represents. Next, you will press Commit and lastly, press Push. Follow the instructions asking for username and password if they pop up!
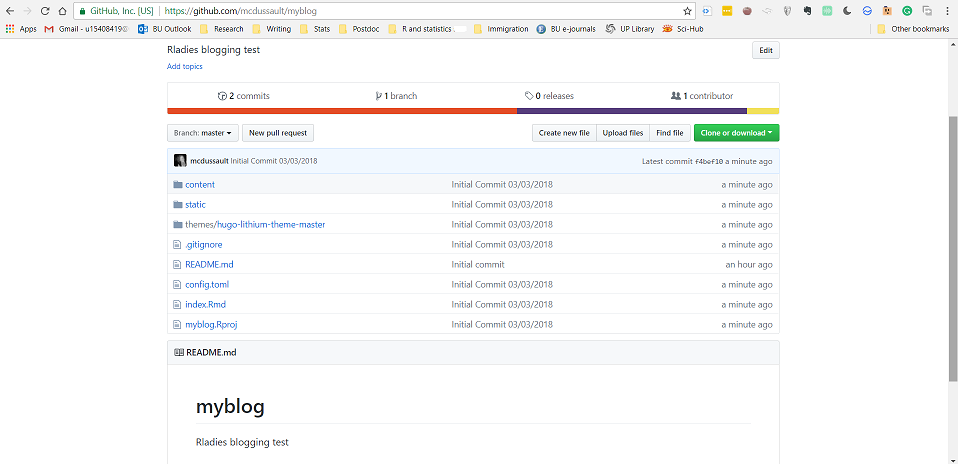
Once you have done the commit to Github, you should check if it has been completed properly by visiting the repo online and checking that all the files are there!
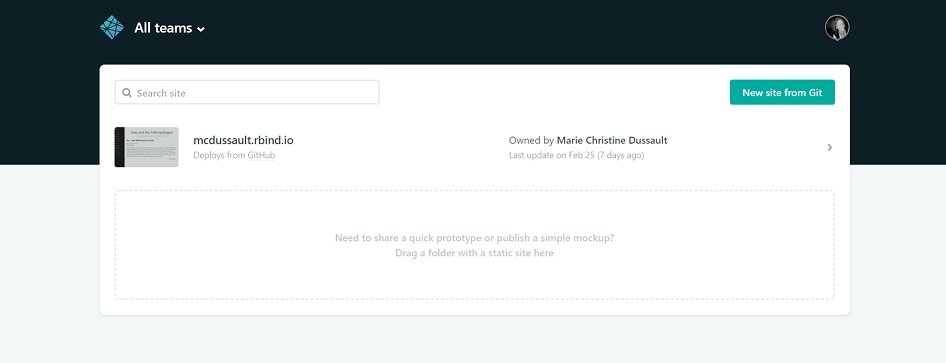
Deploying on Netlify
These are the final set up steps and require that you sign up for an account at Netlify. Once signed up, click on New Site from Git on your main homepage
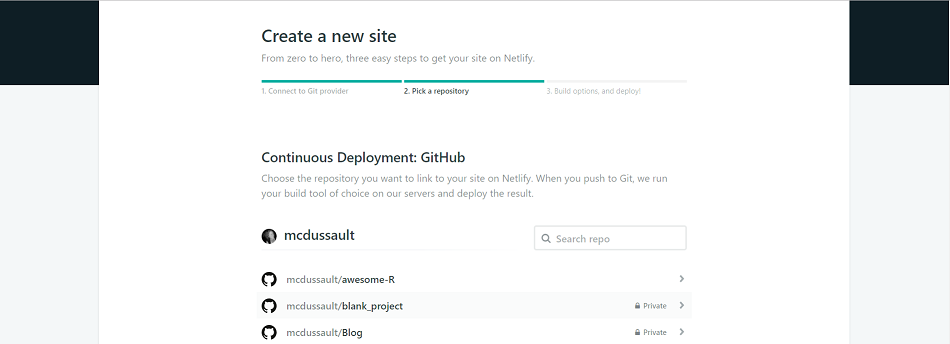
Select Github as the source of the site under Continuous Development and select the repository that your site lives in on Github.
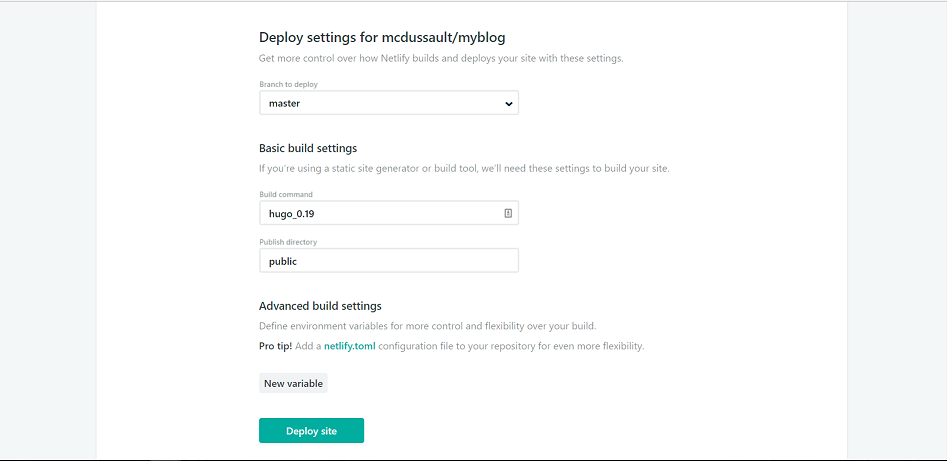
Next, you should set the Build Command to hugo_0.19 and the Publish directory to public
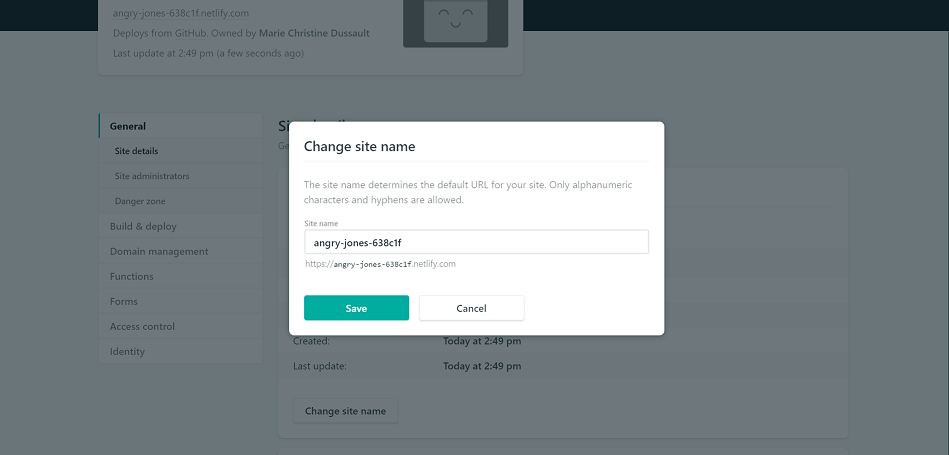
Finally, once you click deploy, it will take you to your general settings. Now, Angry Jones seemed like a perfectly ok name for a website, but it might not be for you! Here you may change the site name by entering your desired blog name and Netlify will tell you if it is available.
 After the site is deployed with the right name, go back to your Config.toml file in R Studio and change the URL at the very top to reflect the Netlify URL for your site.
Writing your first post
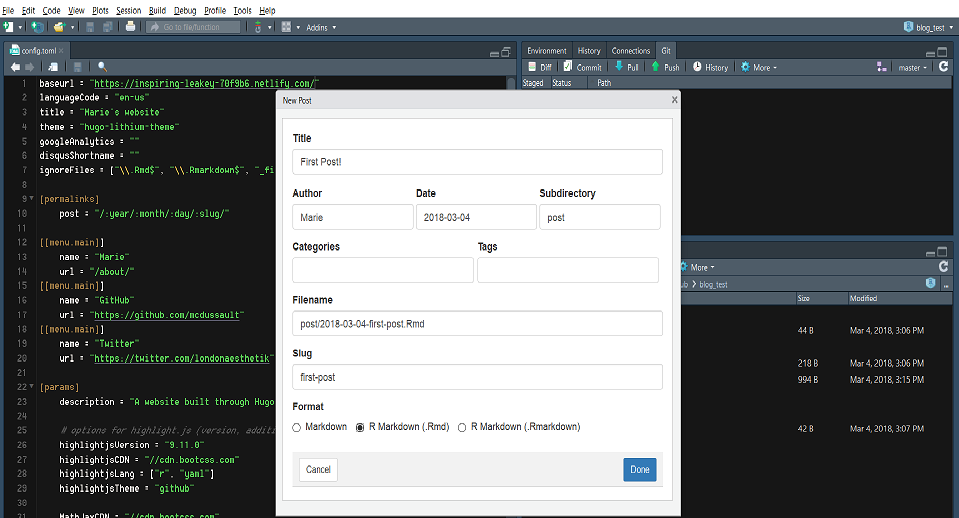
Now you are ready to write your very first post! In the R Studio Addins menu, select New Post
 Write your content, remember to use the Serve site button in the R Studio addins, commit, and push to Github using the same procedure as before! Netlify will update on its own, as will your site! Lastly, go check online to see if your website has populated correctly with the new post. This may take a few seconds while Netlify gets the information from Github.
At this point, you have your very own blog. You can now opt to get a personalised domain or, as I did, join the other R Stats bloggers by getting an Rbind.io subdomain. To get your own rbind.io address, visit Rbind.io on Github and make a request following their template.
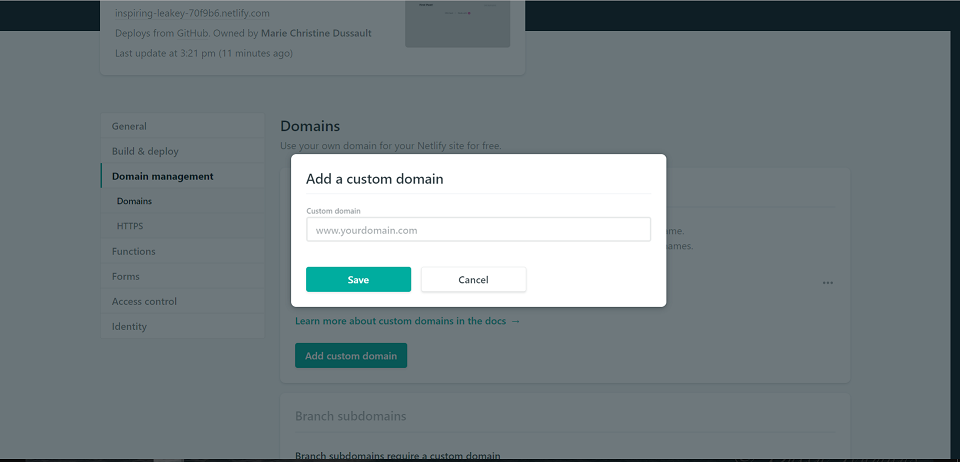
Change subdomain at Netlify
If you chose to get a subdomain with Rbind.io, in your Netlify account, visit Domain Settings and add in your subdomain address. Everything is set up so that your site re-directs correctly.
And that is all you need to do! Thank you!